Gel electrophoresis is a technique used to visualize DNA fragments. For instance, researchers can analyze the results of a PCR reaction by examining the DNA fragments it produces on a gel. Gel electrophoresis separates DNA fragments based on their size, and the fragments are stained with a dye so the researcher can see them.
All DNA molecules have the same amount of charge per mass. Because of this, gel electrophoresis of DNA fragments separates them based on size only. Using electrophoresis, we can see how many different DNA fragments are present in a sample and how large they are relative to one another. We can also determine the absolute size of a piece of DNA by examining it next to a standard “yardstick” made up of DNA fragments of known sizes.
What is a gel? As the name suggests, gel electrophoresis involves a gel: a slab of Jello-like material. Gels for DNA separation are often made out of a polysaccharide called agarose, which comes as dry, powdered flakes. When the agarose is heated in a buffer (water with some salts in it) and allowed to cool, it will form a solid, slightly squishy gel. At the molecular level, the gel is a matrix of agarose molecules that are held together by hydrogen bonds and form tiny pores.
At one end, the gel has pocket-like indentations called wells, which are where the DNA samples will be placed:

Before the DNA samples are added, the gel must be placed in a gel box. One end of the box is hooked to a positive electrode, while the other end is hooked to a negative electrode. The main body of the box, where the gel is placed, is filled with a salt-containing buffer solution that can conduct current. Although you may not be able to see in the image above, the buffer fills the gel box to a level where it barely covers the gel.
The end of the gel with the wall is positioned towards the negative electrode. The end without wells (towards which the DNA fragments will migrate) is positioned towards the positive electrode.
How do DNA fragments move through the gel? Once the gel is in the box, each of the DNA samples we want to examine (for instance, each PCR reaction or each restriction-digested plasmid) is carefully transferred into one of the wells. One well is reserved for a DNA ladder, a standard reference that contains fragments for known lengths. Commercial DNA ladders come in different size ranges, so we want to pick one with good “coverage” of the size range of our expected fragments.
Next, the power of the gel box is turned on, and the current begins to flow through the gel. The DNA molecules have a negative charge because of the phosphate groups in their sugar-phosphate backbone, so they start moving through the matrix of the gel towards the positive pole. When the power is turned on and current is passing through the gel, the gel is said to be running.
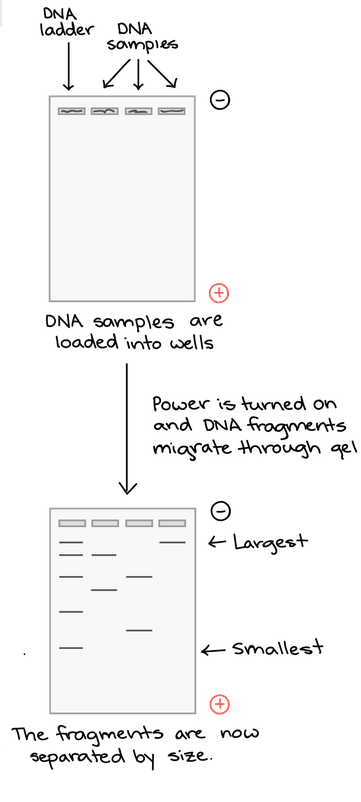
As the gel runs, shorter pieces of DNA will travel through the pores of the gel matrix faster than longer ones. After the gel has run for awhile, the shortest pieces of DNA will be close to the positive end of the gel, while the longest pieces of DNA will remain near the wells. Very short pieces of DNA may have run right off the end of the gel if we left it on for too long.
Visualizing the DNA Fragments
Once the fragments have be separated, we can examine the gel and see what sizes of bands are found on it. When a gel is stained with a DNA-binding dye and placed under UV lights, the DNA fragments will glow, allowing us to see the DNA present at different locations along the length of the gel.
A well-defined “line” of DNA on ta gel is called a band. Each band contains a large number of DNA fragments of the same size that have traveled as a group to the same position. A single DNA fragment (or even a small group of DNA fragments) would not be visible by itself on a gel.
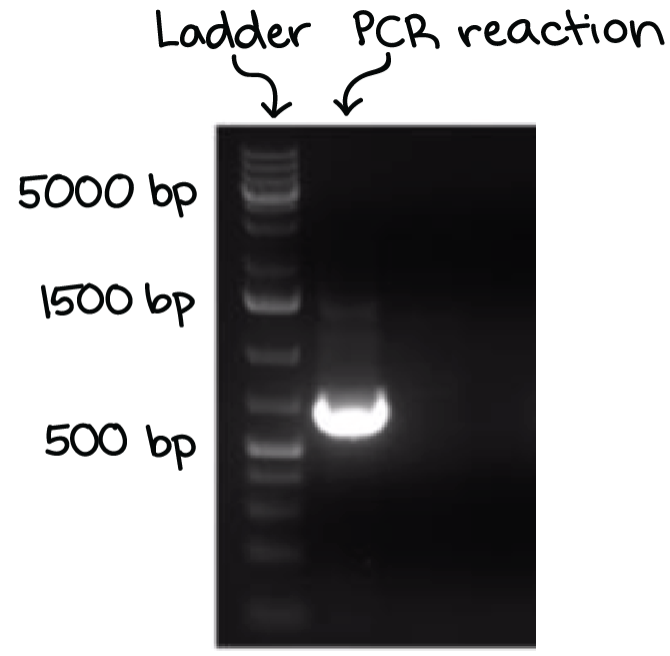
By comparing the bands in a sample to the DNA ladder, we can determine their approximate sizes. For instance, the bright band on the gel above is roughly 700 base pairs (bp) in size.